I had very hard time setting up a wireguard tunnel between these two devices, hence I thought I should write up this guide which might be helpful to anyone else having the same need.
UCG-Ultra LAN: 192.168.177.0/24
UCG-Ultra WAN: Public IP, dynamically changing.
Because RUTX50 is using its mobile interface for its Internet connection, it is not getting a Public IP address but a Private one. Therefore, it cannot operate as a server but only as a client towards the UCG-Ultra which runs the wireguard server.
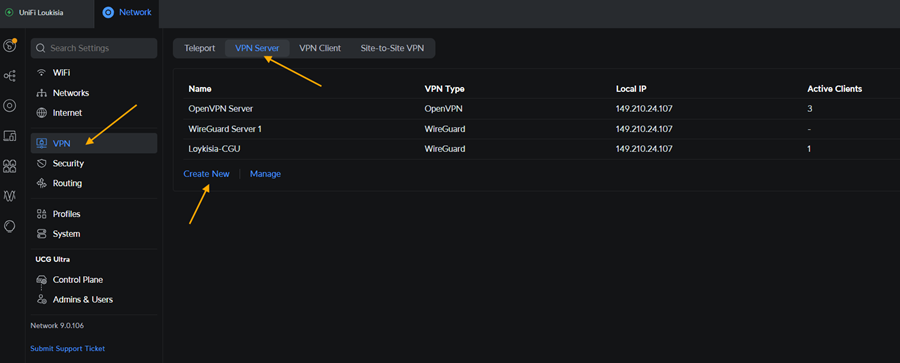
Go to UCG-Ultra settings, VPN, VPN server and click on Create New
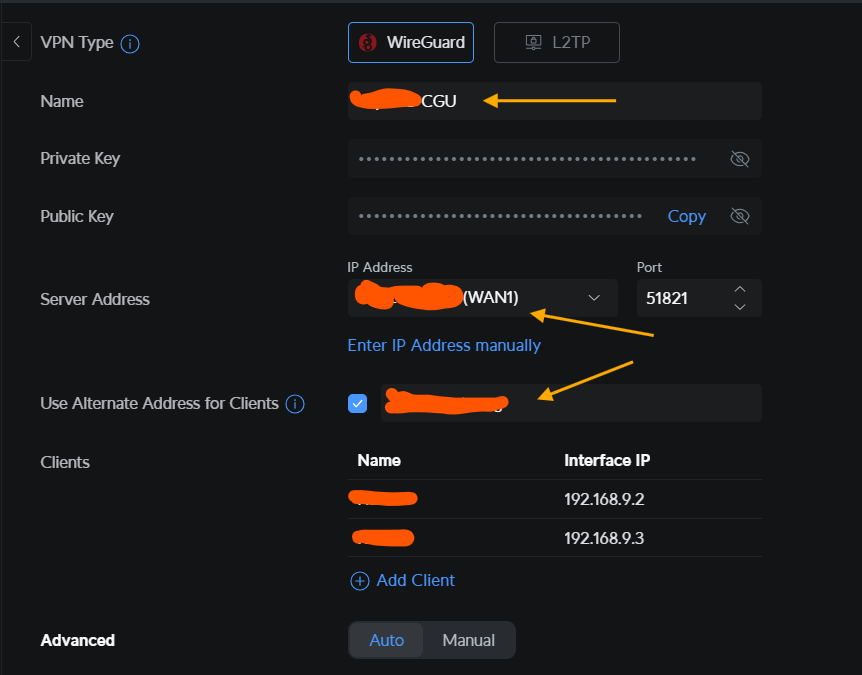
Select type of VPN “Wireguard”, give it a name, select the WAN interface to be listing for new connections, and click on “Use Alternate Address for Clients” if you have a dynamic Public IP. At the textbox you should provide a dynamic dns name that you have previously set up (not part of this guide) to overcome the dynamic IP of your ISP.
Paste the RUTX50 Public key into the relevant box you got at step4.
Give it a name
Write down the Interface IP address, it will be used for a configuration at RUTX50
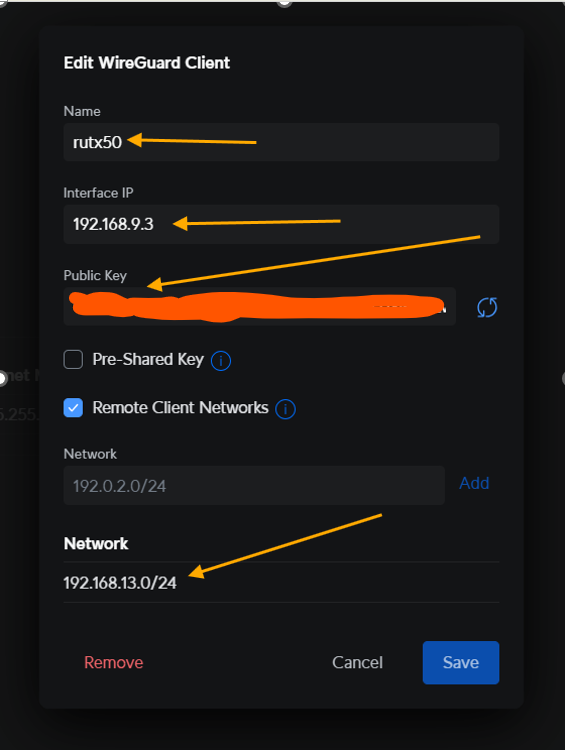
Check on Remote Client Networks, and add RUTX50 LAN subnet(s).
Click Save
Go back to the RUTX50 menu, at the Wireguard server, General settings, IP address, fill up the address you got in the previous step (for me it was 192.168.9.3/24). Click Save & Apply, to store changes.
Right below, at Add new peer instance, give a name of your preference and click add
in the Public key section, you should fill UCG’s public key you noted at step 2. End Point Host should be either Ubiquiti router static WAN IP or if you are using a dynamic DNS , your FQDN (i.e. yourname.noip.com). Allowed IPs: the Interface IP you noted at step 5 plus any other network which is valid at Ubiquiti’s side (i.e. Ubiquiti LANs). In case you are using a different port on your server than default (51820), then go to next page and fill the correct port. You may also try Persistent Keep Alive values to keep the connection open.
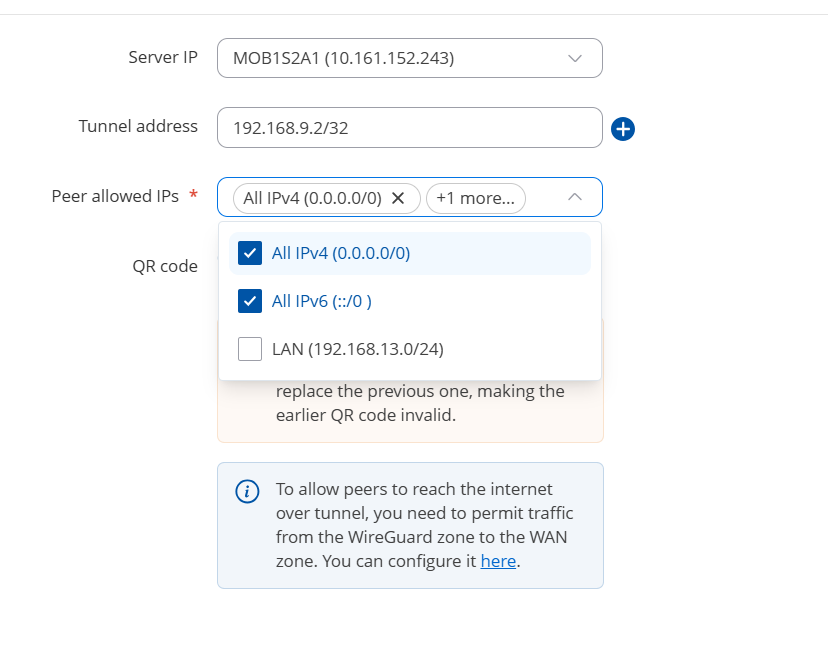
Finally, in the QR code section, set as Tunnel IP the same address you got from step 5 (for me it was 192.168.9.3) in the peer Allowed IPs drowdown, I selected my RUTX LAN subnet and diselected the 0.0.0.0 as I didn’t want to route all my internet through the tunnel (not sure if this was correct or not). Click apply & save as long as needed to exit and a site to site VPN between the two devices should be already up and running.
My only issue, and here is my turn to ask for some help, is that the tunnel doesn’t stay on.
If the server changes IP, or maybe after some time, the tunnel goes off permantly. It needs me to go at rutx50 and play with some settings to cause a new connection attempt at the server.
Also this QR setting screen seems to be buggy. Meaning, whenever I try to save settings, they always return to original settings after saving.
The corner case in wireguard_watchdog I am aware of is related to the dns servers, if they are restricted to the tunnel itself the resolutions will fail if the tunnel goes down, the simplest fix is to replace
wg set ${iface} peer ${public_key} endpoint "${endpoint_host}:${endpoint_port}"
by
  ubus call network.interface.${iface} down
  ubus call network.interface.${iface} up
I will certainly have a peer, and from another of your posts, I increased the timeout on the wireguard_watchdog by 10 seconds as we have a particular device in the mountains that gets very poor service, with the variable atmospherics.
If you are routing all traffic through the tunnel, then you may well benefit from implementing the solution above. Even if you aren’t, the end-result of ‘re-establishing’ the tunnel is the same if not better, as it’s more of a ‘catch-all’.
The amended /usr/bin/wireguard_watchdog will read as follows …
This also applies if you route all the dns traffic and one or more internal networks through the tunnel, the rest going through the native interface. I use that for adblocking.